顯示具有 LiveCode 標籤的文章。 顯示所有文章

2017年1月16日 星期一

LiveCode Android External: Integrate Facebook and Google Login

I've used LiveCode for more than five years. As a Android developer using LIveCode, it always feel like there is less support for Android than iOS. Thanks to Monte, we have lots of iOS externals to use in LiveCode Indy. It will be great if we have all these externals in Android version. I have some experience about building Android external. So I decided to do it myself. I think it will definitely enhance people's intention to use LiveCode. Hope someday my external will be integrated into LiveCode Indy just like Monte did.

Start with Facebook and Google login function.

[Facebook]
First we need to initialize Facebook SDK.
on mouseUp                                           
     put haoFacebookInit("{APP_ID}")
end mouseUp                                        


Then open Facebook login view and pass the permissions you wish.
put haoFacebookLogin("email"&cr&"public_profile") into tResult


After successfully login we can get the access token. With access token, we are able to use the Graph API. Graph API can do a lot of things such as getting user name, id, photos even post photos almost anything.

put haoFacebookGetAccessToken() into tToken
GET URL ("https://graph.facebook.com/me?access_token="&tToken)

answer the urlResponse


[Google]
It's much easier to login to Google using LiveCode External. Just one command.


put haoGoogleAuthLogin() into tResult 

This command open Google login view.


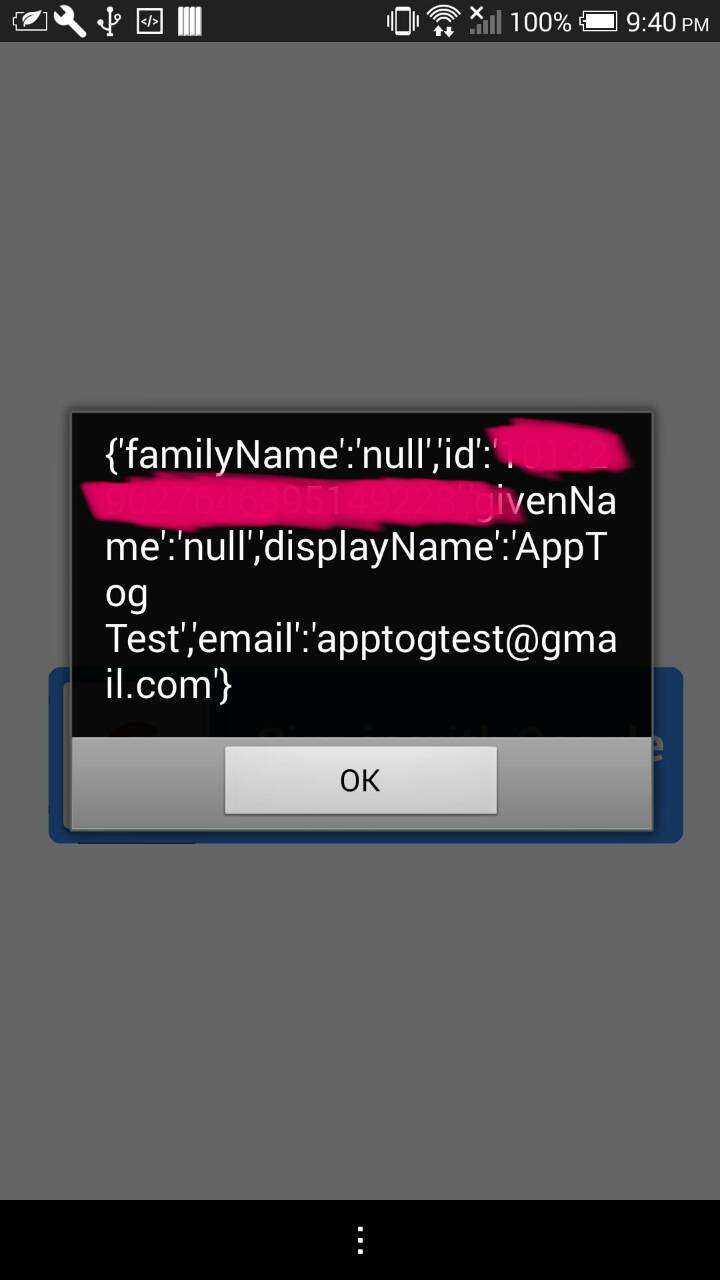
When successfully login. Account information will return to LiveCode. 


These two simple login function take me several days. It's a good start and I will try to build more and make them more stable.

2015年7月23日 星期四

Use LiveCode to Create Android Launcher

Few weeks ago, people ask me if LiveCode can create an android launcher. Today, I've make a quick demo. Surprisingly it's very easy to accomplish with my new external called "HaoUtil1". This external include some useful function in android environment. Such as, log message to Logcat, toast message on screen. One of these functions is to get all installed application's information(name, icon, package name etc.). So, here's the screenshot.


With this function, I can display all the apps. Here I pick only the first 9 apps.

By clicking these icons. It should open corresponding app. Here's comes another external function includes in HaoUtil1. "haoLaunchApp" can provide you the ability to open other apps that installed in your device, inside your LiveCode stacks.

To prove this is a real launcher app, click the home button on mobile phone.

You can see the two selection. One is HTC device default home(launcher) app the other is my LiveCode launcher.

This is a very rough demo. Still have lot of things to do. But it did verify that LiveCode really can do about just anything. So keep going LiveCoders :)

2015年5月8日 星期五

HaoPlayer: LiveCode Android External, Support background audio playing

haoPlayer   

Price: $9.99 USD, include all updates.

Chiu, Chih Hao (HedgeHao) @ 2015/05/08

>>2015/05/08
    *Initial Version


LiveCode Version : 7.0.4

  HaoPlayer is an LiveCode External for Android devices. It is a audio player object for Livecode on android envionment. The difference between haoPlayer and original LiveCode Player is, haoPlayer can play in background! You can play audio in background while you are browsing websites or texting messages or doing other things.

Installation
1.  Copy "revsaveasandroidstandalone.livecodescript" in haoPlayer-1.0.0.zip to 
[LiveCode install path]/Tools/Toolset/libraries/ . (Backup the original "revsaveasandroidstandalone.livecodescript" file in case something went wrong)


2. Add "haoplayer.lcext" and "AndroidManifest.xml" to the copy files of your stack


Documentation & Demo


1. haoPlayerCreate()Create and initialize haoPlayer.


2. haoPlayerAddTrack(AudioFilePath)Add audio file to play list.
3. haoPlayerPlay()
Start playback


4. haoPlayerPause()

Pause playback.


5. haoPlayerResume()
Resume playback


6. haoPlayerNext()
Start to play the next track on play list.


7. haoPlayerPrev()
Play previous track on play list.


8. haoPlayerJumpTo(trackNum)

Play specific track on the play list. Start from 0.


9. haoPlayerGetCurrentTrack()
Retrun the track number which is playing now.


10. haoPlayerGetCurrentTime()
Return the current position of the playing track.

11. haoPlayerSetCurrentTime()Set the current position of the playing track.

12. haoPlayerGetDuration()Return the duration of the current track which is now playing.13. haoPlayerSetVolume(volume)
Set the volume of playback. Volume is in range 0.0 to 1.0

14. haoPlayerSetPlayMode(mode)
There are four mode can be set.

0: Normal Mode, play from the begining track to the last one. No repeat and no loop.
1: Repeat Mode, play from the beining track to the last one and back to the first one.
2: Loop Mode, looping current track.
3: Shuffle Mode, random pick one song to play.

15. haoPlayeGetCurrentTrack()
Return the currentTrack number. Start from 0.


16. haoPlayerClearTrackList
Clear all track on play list and stop playback.

17. haoPlayerDestory()
Remove haoPlayer from application


2015年5月4日 星期一

HedgeHao LiveCode Android External Store -- HaoDropbox4LC for $7.99 USD (2015/05/04 update)


HaoDropbox4LC_Doc


HaoDropbox4LC is an LiveCode Android External for user to create, download, modify and delete folders and files on user's dropbox account. HaoDropbox4LC includes Dropbox Android SDK.
Price : $7.99 USD / each
The payment is processed via PayPal. Please
send an email to me (hedgehao@gmail.com) if you want to place an order.
You will receive an invoice. After the payment is finished, you will
get your external files through your email.


Document    

Chiu, Chih Hao (HedgeHao) @ 2015/05/04

Installation

LiveCode Version : 7.0.4

1. First you need to replace LiveCode built classes for android
with the "Classses" file in haoDropbox4LC-1.0.0.zip. I made some
changes in LiveCode Classes to fit Dropbox's API. Copy "Classes" in
haoDropbox4LC-1.0.0 to [LiveCode install path]/Tools/Runtime/Android.
(Backup the original Classes file in case something went wrong)


2.  Copy "revsaveasandroidstandalone.livecodescript" in
haoDropbox4LC-1.0.0.zip to
[LiveCode install
path]/Tools/Toolset/libraries/ .
(Backup the original "revsaveasandroidstandalone.livecodescript"
file in case something went wrong)


3. Add "haoDropbox4LC.lcext" and "AndroidManifest.xml" to the copy
files of your stack


4. Make sure "Internet" is check in Android permissions setting


5. Set up Dropbox Develop App on
https://www.dropbox.com/developers/apps. Get your API_KEY and API_SCRET


Documentation
function haoDropboxInit(apiKey, apiScret)
Set up your develop account key and scret which get from Dropbox. Need to be call before any other functions.

return : "OK" if success


function haoDropboxLink()
Link to user's Dropbox account.

return : "OK" if success


function haoDropboxUnLink()

Unlink from Dropbox account.


return : "OK" if success

function haoDropboxIsLinked()


Check if application is linked to Dropbox.


return : "true" if the current session is linked to a account, esle retrun "false"


function haoUpload(dropboxPath, localFilePath)

Upload a file to Dropbox
*dropboxPath : the full dropbox path where to
upload file.


*localFilePath : path of the file you want to upload.

return : "OK" if success

function haoDropboxCreateFolder(dropboxPath)

Create a Dropbox folder.

*dropboxPath : the Dropbox path to the new folder.

return : "OK" if success

function haoDropboxListDirectory(dropboxPath)

list all files and subfolders in Dropbox folder.

*dropboxPath : the Dropbox path to the directory for which to list
return : the metadata of all contents in folder (JSON format).

function haoDropboxDownload(dropboxFilePath, localFilePath)

Download a file from Dropbox

*dropboxFilePath : the dropbox path to the file.

*localFilePath : file path where you want to save this file.

return : "OK" if success
, "FAIL" if file does not exists or connection lost.

function haoDropboxMove(fromPath, toPath)


Moves a file or folder (and all of the folder's contents) from one path
to another.
*fromPath : the dropbox path to move from.

*toPath : the dropbox path to move to.


return : "OK" if success, "FAIL" if file does not exists or connection lost.


function haoDropboxCopy(fromPath, toPath)
Copy a file or folder (and all of the folder's contents) from one path
to another.
*fromPath : the dropbox path to copy from.

*toPath : the dropbox path to copy to.


return : "OK" if success, "FAIL" if file does not exists or connection lost.


function haoDropboxDelete(dropboxFilePath)

Delete a file or folder (and all of the folder's contents).


*dropboxFilePath : the dropbox path to delete.
return : "OK" if success, "FAIL" if file does not exists or connection lost.


function haoDropboxShare(dropboxFilePath)

Get a url for sharing the specified directory or file.

*dropboxFilePath : the dropbox path to share.
return : the url of sharing file or directory.


2015年1月26日 星期一

LiveCode Language Package -- Multi-Language IDE Interface

LiveCode 7 release last year. With fully support Unicode, we can write for example, Chinese in LC script. But that's not enough! Since LiveCode China and LiveCode Taiwan start promoting LiveCode in Asia last year. Many LC beginners ask if we have Chinese interface. With a little hard work. I've made it.


Here is the menu bar with Traditional Chinese.

File menu with Traditional Chinese.

Help menu with Traditional Chinese.

Chinese menu while right click objects, cards and stacks.

Chinese menu on the Project Browser.

I also wrote an installation program to modify the display language on LC IDE. Can run on MacOS and Windows. You can download it at https://www.dropbox.com/s/1ckvkagyvkglniz/LCLanguagePack.zip?dl=0. Follow the instructions below to install on your LC IDE. (Only support Traditional Chinese and Simplified Chinese now.)


Steps:
(This is a beta version. Many bugs might happen...)

0. (**IMPORTANT) Install a new version of LiveCode (7.0 and later) in case break the original one.

1. Unzip LCLanguagePack.zip. Run "LCLangSettings" (Mac) or "LCLangSettings.exe" (Windows).

2. After open program, select the language you want.  Support Traditional Chinese (zh_TW) and Simplified Chinese (zh_CN) now.

3. Click the second button below. Choice where LiveCode install. e.g., /Applications/LiveCode Community 7.0.1.app (Mac) or C:\Program Files (x86)\RunRev\LiveCode Community 7.0.1\  (Windows)

4. Open LiveCode check if it works!


If you want to add your own language. Check the language settings which write in JSON format. You can see the settings file at https://github.com/HedgeHao/LCLangaugePack/blob/master/language.lcconfig. If you add your language text please share the settings file to the community.


HedgeHao (Chiu Chih-Hao)@LiveCode Taiwan
2015/01/26


2014年10月11日 星期六

LiveCode External for bluetooth -- Controlling Arduino using LiveCode

I made a bluetooth external for livecode. Bluetooth are a good way to control Arduino, Raspberry Pi or other embedded system. I use this external to make a app to turn on and off the led connected on Arduino UNO. Here are the photos and demo video(here).


2014年8月4日 星期一

LCGMap -- Google Map on LiveCode

Google Map is a well know online map services and is widely used in mobile apps. I made this livecode program as module to plug into any other livecode programs. Google has release many functions' api. I just implement some of them. As you may see in this article and the demo videos.

The video link is here : http://youtu.be/PHU9I-CiRks

First thing to is to display a map with central point sets.
I set the center of this map to "台北" which is the Traditional Chinese for "Taipei". It's the capital city of Taiwan. Also set the zoom to 12. In my LCGMap, you can use either latitude and longitude or the name of that place to set the locations.

Next, I can add some markers to the position where I want. As you can see two maker field. One use latitude and longitude the other use English name of the location. Here's the result.

We can use the direction service of Google Map, too. Just set the start location and the end location. When I click "Direct" the route will calculate and draw on the map.

The second card show the Google Places service. It can find the restaurants, parks, banks and other types of places you are looking for. It can also set the radius for a fix location to find out the places in this area. In this demo I set the radius to 5000 meters as default. First I set the central location to Taipei city and search for the banks in 5000 meter radius.
When clicked the marker. It will show the name of this place.

Then I change the type to restaurant and search again. You can see the restaurants in this area.

I've accomplish just a few functions in Google Map. But these are some functions I often use. Maybe more when I have time:)

2014年7月24日 星期四

Using LiveCode on Raspberry Pi – Demo 1 : PIR sonsor & LED (Traditional Chinese)

      (You can see this article in english here : http://hedgehao.blogspot.tw/2014/07/raspberry-pi-has-26-gpio-pins-on-it-it_24.html)
      Raspberry Pi擁有26個GPIO腳位(新版的Raspberry Pi Model +新增至40個腳位),GPIO的腳位可以用來控制LED燈泡、各種感應器、馬達等等,這篇文章中我將要分享PIR這個動作感應器配合LED燈泡來做回應,當偵測到動作時燈泡會亮起,當動作結束後燈泡會熄滅。


      可以參考這個Demo影片:http://youtu.be/ZLLmuAAM7Cc
      在LiveCode的程式碼中,我設定了2秒的等待時間(這個等待時間是參考一些網路上的教學文章),所以在影片當中可以看到揮動手的時候燈泡並沒有馬上的反應,而會有一段延遲時間,這個程式碼是公開發佈的,大家可以自行修改這個等待時間,或許能夠找出最適合的延遲時間。
      以下是這個範例的電路圖:
      這個電路圖並不完全和影片和照片中的相同,為了呈現的方便我將他簡化了。首先將PIR sesnor接上RPi,將PIR的電源(紅色線)接上RPi 的5V腳位,接地(黑色線)接到RPi 的接地腳位,訊號線(黃色線)接到RPi的GPIO18腳位,訊號線”必須”接到18腳位,因位程式中設定的是控制18這個腳位。
      再來是LED的部分,在LED負極接上一個電阻,電阻的另一端接到RPi的GND腳位,LED的正極接到GPIO4腳位,一樣是程式中設定控制的腳位。

      這次Demo的範例程式提供兩個LiveCode External,可以在這裡下載:

      下載完後將檔案解壓縮,執行”haoRPiDemo1.rev”。
      如果你試圖移動三個檔案的位置,必須依照下列步驟從新設定external位置:把”haorpiled.so”、”haorpipir.so”兩個external放到適合的資料夾中,例如“/home/pi/haopir”。接著打開壓縮檔中的範例程式” haoRPiDemo1.rev”,將Stack的External屬性設定為兩個External存放的路徑位置,或是透過屬性面板的External Reference來設定。

存檔之後重新開啟LiveCode(確保External有被載入到Stack中)。
執行時先按下按鈕”setup”來開啟GPIO的控制連線,如果沒有出錯的話Message Box應該顯示出”OK”的字樣,接著就可以按下按鈕”Start Detect”開始偵測,如果PIR偵測到動作的話LED就會亮起,若動作停止了,LED燈就會熄滅。
再來談談程式碼,程式碼的部分非常簡單,以LED為例,首先利用” haoRPiLEDOpen()”來做基本的設定工作,接著可以使用”haoRPiLEDLight()”、“haoRPiLEDDark()”來控制LED燈泡的亮、暗。以PIR來說可以透過”haoRPiPIRReadMotion()”來讀取PIR的資料,讀取的資料中1代表針測到動作0代表動作停止,當LiveCode讀到資料後會送出” PIRSensorDidReadValue”這個訊息到目前顯示的卡(current card)上。最後當程式結束前,記得將GPIO的控制連線關閉,使用“haoRPiPIRClose()”、 “haoRPiLEDClose()”。
這邊提到的所有函式(Function)在LiveCode都定義為Function而不是Command,如果執行的過程中沒有出錯,每個函式應該會回傳“OK”的字樣。

以上就是這次的Demo,感謝收看,如果發現有任何Bug請通知我 J。

Using LiveCode on Raspberry Pi – Demo 1 : PIR sonsor & LED (English)

    Raspberry Pi has 26 GPIO pins on it (it will be up to 40 pins on new RPi Model B+). It can controls the LEDs, sensors, motors and many others. In this article I’m going to demo a program writing in LiveCode sciprts to detect motions using PIR motion sensor. When sensor detect motions light up the LED. When that motion is gone LED went dark.

    Here’s the demo vidieo : http://youtu.be/ZLLmuAAM7Cc
 
    In my script, I set the program to wait 2 seconds for each detection(Which some tutorial on the web suggests). That’s why you could possibly feel the delays of the sensor’ detection in the video. My LiveCode script in this demo are opened. Maybe you could try yourself to modify the waiting time. To find the best time setting.

    Here’s the electrical circuits:
    There circuits here are not exactly the same us the circuits you can see in the photo or video. I make it as simple as it can. 
    First, connect PIR to our RPi. Connect PIR-VCC (red) to 5V pin and PIR-GND(black) to any GND pin on RPi. Connect PIR-OUT (yello) to GPIO18 pin. You HAVE TO connect to GPIO 18 cause the program is written to control GPIO 18 pin. 
    Second, plug LED cathode to resistor on breadboard. The other pin of resistor connect to GND pin. Remember to connect LED anode the GPIO 4 which the program sets.

    In this demo I offer two LiveCode externals. You can download them here :

    Unzip the file.Run “haoRPiDemo1.rev”.
    
    If you move the three files to other place. You should reset the external as following steps. Put “haorpiled.so” and “haorpipir.so” into the proper direction let’s say “/home/pi/haopir”.Open the demo program “haoRPiDemo1.rev” .Set the external of this stack to the both file path. You can use the Inspector to set the External References, either.
    Save stack , restart LiveCode IDE just to be sure the library load into our stack file.

    When the stack is open. First press button “setup” to open the GPIO connection. If everything goes well the message box will display message “OK”. Then press button “Start Detect” the PIR sensor will start the detection.When PIR dectect motion LED will light up.
    Scripts are simple. Take LED for example. First use “haoRPiLEDOpen()” to setup. Function “haoRPiLEDLight()” to light up LED,”haoRPiLEDDark()” to shut down LED.For PIR sensor, after setup you can use “haoRPiPIRReadMotion()” to read values. 1 means motion detect, 0 means no motion detect. When LiveCode did read a value, it will send a message “PIRSensorDidReadValue” with the read value as first parameter.At the end of the program you should close the GPIO connections.Use function “haoRPiPIRClose” and “haoRPiLEDClose” to accomplish that.
        Remember all the function you can use is defined as function in LiveCode(instead of command), It will return “OK” if everything goes well.

That’s all ! Thanks for watching.
If you find any bugs.That me know. J

中文版連結:中文版

2014年7月17日 星期四

Android Socket for LiveCode

So many people using LiveCode are looking forward to have a socket on Android.
You can use socket on Windows, Linux, Mac OS and there is also an external for iOS.
Now, I wrote a socket external for Android.
Take a look at what I've done.

First, I use my notebook as a server which IP is 192.168.0.103
My Android mobile phone as a client which IP is 192.168.0.102

Here's my demo stack.I'm going to show you the function on TCP socket.
As you can see, the connection state on the top is "Closed" when I open the stack.
Laptop(left)  Android Phone (right)

when I hit "accept" the laptop start to act like a server to wait for connections in.
The connection state then change to "Waiting".
When the server is set up. I hit the "open" button on the Android phone. You can see the message tells that my phone is connected. The connection state change to "Connected" on the phone.
Next, when I hit button "write" on the laptop. There server will write a message which is type on the "Send Message" area. On my mobile phone I can hit button "read". The message that the server just send will be received on the phone.
On the other hand, when I hit button "write" on the phone. Server should have received the message. This time I change the message to "From Android Phone"

Finally, when I close the connection on either side. Both the laptop and the phone will call an close message then answer the close message. (I have not change the file descriptor to real IP on Android so you can see the 52 on the screen)
That's all for today! Hope you enjoy it!